> ## Documentation Index
> Fetch the complete documentation index at: https://algolia.com/llms.txt
> Use this file to discover all available pages before exploring further.

# Get started with InstantSearch.js

> Use InstantSearch.js to create a dynamic, filterable search UI.

export const SearchQuery = () => <Tooltip tip="The text users enter into a search box. In the Search API, this corresponds to the query parameter. A search query is often used with filters, facets, and other parameters, but these aren't part of the query text itself.">
    search query
  </Tooltip>;

export const Index = () => <Tooltip tip="An Algolia index is a searchable dataset that consists of records and configuration settings. These settings define how the records are searched and ranked.">
    index
  </Tooltip>;

export const Filter = () => <Tooltip tip="A filter is a condition that limits which records Algolia returns. Filters often use one or more facet-value pairs, such as brand:Apple AND color:red. You can also filter by numeric values, dates, tags, booleans, or geographic constraints." cta="Filtering" href="/doc/guides/managing-results/refine-results/faceting">
    filter
  </Tooltip>;

export const ApplicationID = () => <Tooltip tip="A unique alphanumeric string that identifies an Algolia application." cta="Application ID (dashboard)" href="https://dashboard.algolia.com/account/api-keys">
    application ID
  </Tooltip>;

export const APIKey = () => <Tooltip tip="An alphanumeric string that controls access to the Algolia APIs. It defines what actions are allowed, such as searching an index or adding new records." cta="API key" href="/doc/guides/security/api-keys">
    API key
  </Tooltip>;

export const FlavorSwitcher = ({current, baseHref = "", options = [], label = "InstantSearch framework"}) => {
  if (options.length === 0) {
    return <div className="not-prose" role="alert" style={{
      margin: "0.25rem 0 1.5rem",
      padding: "0.75rem",
      border: "1px solid #f59e0b",
      borderRadius: "0.625rem",
      color: "inherit",
      fontSize: "0.875rem"
    }}>
        FlavorSwitcher requires at least one option.
      </div>;
  }
  const selected = options.find(option => option.value === current) ?? options[0];
  return <div className="not-prose mint-flavor-switcher">
      <style>{`
        .mint-flavor-switcher {
          --mfs-bg: #ffffff;
          --mfs-bg-hover: #f4f4f5;
          --mfs-bg-current: #eef2ff;
          --mfs-border: #d4d4d8;
          --mfs-fg: #18181b;
          --mfs-muted: #71717a;
          --mfs-accent: #4f46e5;
          position: relative;
          width: min(100%, 19rem);
          margin: 0.25rem 0 1.5rem;
          color: var(--mfs-fg);
          font-size: 0.875rem;
          line-height: 1.25rem;
        }

        .dark .mint-flavor-switcher {
          --mfs-bg: #18181b;
          --mfs-bg-hover: #27272a;
          --mfs-bg-current: #272747;
          --mfs-border: #3f3f46;
          --mfs-fg: #fafafa;
          --mfs-muted: #a1a1aa;
          --mfs-accent: #a5b4fc;
        }

        .mint-flavor-switcher details {
          position: relative;
        }

        .mint-flavor-switcher summary {
          display: flex;
          min-height: 2.75rem;
          box-sizing: border-box;
          align-items: center;
          justify-content: space-between;
          gap: 0.75rem;
          padding: 0.625rem 0.75rem;
          border: 1px solid var(--mfs-border);
          border-radius: 0.625rem;
          background: var(--mfs-bg);
          color: var(--mfs-fg);
          cursor: pointer;
          font-weight: 600;
          list-style: none;
          transition: border-color 150ms ease, box-shadow 150ms ease;
        }

        .mint-flavor-switcher summary::-webkit-details-marker {
          display: none;
        }

        .mint-flavor-switcher summary:hover {
          border-color: var(--mfs-accent);
        }

        .mint-flavor-switcher summary:focus-visible {
          outline: 2px solid var(--mfs-accent);
          outline-offset: 2px;
        }

        .mint-flavor-switcher__label {
          overflow: hidden;
          text-overflow: ellipsis;
          white-space: nowrap;
        }

        .mint-flavor-switcher__chevron {
          flex: none;
          transition: transform 150ms ease;
        }

        .mint-flavor-switcher details[open] .mint-flavor-switcher__chevron {
          transform: rotate(180deg);
        }

        .mint-flavor-switcher__menu {
          position: absolute;
          z-index: 50;
          top: calc(100% + 0.375rem);
          left: 0;
          width: 100%;
          box-sizing: border-box;
          margin: 0;
          padding: 0.375rem;
          border: 1px solid var(--mfs-border);
          border-radius: 0.625rem;
          background: var(--mfs-bg);
          box-shadow: 0 12px 30px rgb(0 0 0 / 16%);
          list-style: none;
        }

        .mint-flavor-switcher__menu li {
          margin: 0;
          padding: 0;
        }

        .mint-flavor-switcher__option {
          display: grid;
          gap: 0.125rem;
          padding: 0.625rem 0.75rem;
          border-radius: 0.4rem;
          color: var(--mfs-fg);
          text-decoration: none;
        }

        .mint-flavor-switcher__option:hover {
          background: var(--mfs-bg-hover);
        }

        .mint-flavor-switcher__option:focus-visible {
          outline: 2px solid var(--mfs-accent);
          outline-offset: -2px;
        }

        .mint-flavor-switcher__option[aria-current="page"] {
          background: var(--mfs-bg-current);
          color: var(--mfs-accent);
        }

        .mint-flavor-switcher__name {
          font-weight: 600;
        }

        .mint-flavor-switcher__description {
          color: var(--mfs-muted);
          font-size: 0.8125rem;
        }

        @media (prefers-reduced-motion: reduce) {
          .mint-flavor-switcher summary,
          .mint-flavor-switcher__chevron {
            transition: none;
          }
        }
      `}</style>

      <details>
        <summary aria-label={`${label}: ${selected.label}`}>
          <span className="mint-flavor-switcher__label">{selected.label}</span>
          <svg className="mint-flavor-switcher__chevron" width="18" height="18" viewBox="0 0 24 24" fill="none" stroke="currentColor" strokeWidth="2" strokeLinecap="round" strokeLinejoin="round" aria-hidden="true">
            <path d="m6 9 6 6 6-6" />
          </svg>
        </summary>

        <ul className="mint-flavor-switcher__menu" aria-label={label}>
          {options.map(option => {
    const isCurrent = option.value === selected.value;
    const href = option.href ?? `${baseHref.replace(/\/$/, "")}/${encodeURIComponent(option.value)}`;
    return <li key={option.value}>
                <a className="mint-flavor-switcher__option" href={href} aria-current={isCurrent ? "page" : undefined}>
                  <span className="mint-flavor-switcher__name">
                    {option.label}
                  </span>
                  {option.description ? <span className="mint-flavor-switcher__description">
                      {option.description}
                    </span> : null}
                </a>
              </li>;
  })}
        </ul>
      </details>
    </div>;
};

<div className="mint-flavor-switcher-slot not-prose">
  <FlavorSwitcher
    current="js"
    baseHref="/doc/guides/building-search-ui/getting-started"
    options={[
{ value: "js", label: "JavaScript", description: "InstantSearch.js" },
{ value: "react", label: "React", description: "React InstantSearch" },
{ value: "vue", label: "Vue", description: "Vue InstantSearch" },
{ value: "ios", label: "iOS", description: "InstantSearch iOS" },
{ value: "android", label: "Android", description: "InstantSearch Android" },
{ value: "flutter", label: "Flutter", description: "Algolia for Flutter" },
]}
  />
</div>

## Before you begin

This quickstart requires:

* Basic JavaScript knowledge.
* **[Node.js](https://nodejs.org/en/download)** version 16 or later with **npm** version 5.2 or later.

## Quickstart

In this quickstart, you'll add an Algolia search interface to some starter code.
The code:

* Displays and formats a search box and results
* Uses InstantSearch's pre-built UI components (widgets) to filter results

<Columns>
  <Card title="Open CodeSandbox" icon="box" href="https://codesandbox.io/s/github/algolia/instantsearch/tree/master/examples/js/getting-started">
    Run and edit the InstantSearch.js quickstart example in CodeSandbox.
  </Card>

  <Card title="Explore source code" icon="github" href="https://github.com/algolia/instantsearch/tree/master/examples/js/getting-started">
    Browse the source for the InstantSearch.js quickstart example on GitHub.
  </Card>
</Columns>

<Steps>
  <Step title="Add starter code">
    To generate some starter code, use the `create-instantsearch-app` tool.
    It provides the <Index /> data, all necessary code, and predefined credentials (<ApplicationID /> and <APIKey />).

    In a terminal, paste:

    ```sh Command line icon=square-terminal theme={"system"}
    npx create-instantsearch-app@latest ais-ecommerce-demo-app \
      --template "InstantSearch.js" \
      --app-id "B1G2GM9NG0" \
      --api-key "aadef574be1f9252bb48d4ea09b5cfe5" \
      --index-name demo_ecommerce \
      --attributes-to-display name \
      --attributes-for-faceting ''
    ```

    This command creates a folder structure on your machine:

    ```txt theme={"system"}
    ais-ecommerce-demo-app/
    ├── node_modules
    ├── src
    │   ├── app.css
    │   └── app.js
    ├── .editorconfig
    ├── .eslintignore
    ├── .eslintrc.js
    ├── .gitignore
    ├── .prettierrc
    ├── favicon.png
    ├── index.html
    ├── package.json
    └── README.md
    ```
  </Step>

  <Step title="Add the search UI">
    1. In `index.html`, remove the `<header>`, and replace `<div class="container">` with:

       ```html HTML icon=code-xml theme={"system"}
       <div class="ais-InstantSearch">
         <h1>InstantSearch.js e-commerce demo</h1>

         <div class="right-panel">
           <div id="searchbox"></div>
           <div id="hits"></div>
           <div id="pagination"></div>
         </div>
       </div>
       ```

    2. Open `src/app.css` and replace its content with:

    ```css CSS icon=paintbrush theme={"system"}
            body {
              font-family: sans-serif;
              padding: 1em;
            }
            .ais-SearchBox {
              margin: 1em 0;
            }
    ```
  </Step>

  <Step title="Run the app">
    1. In your terminal, type:

       ```sh Command line icon=square-terminal theme={"system"}
       cd ais-ecommerce-demo-app
       npm start
       ```

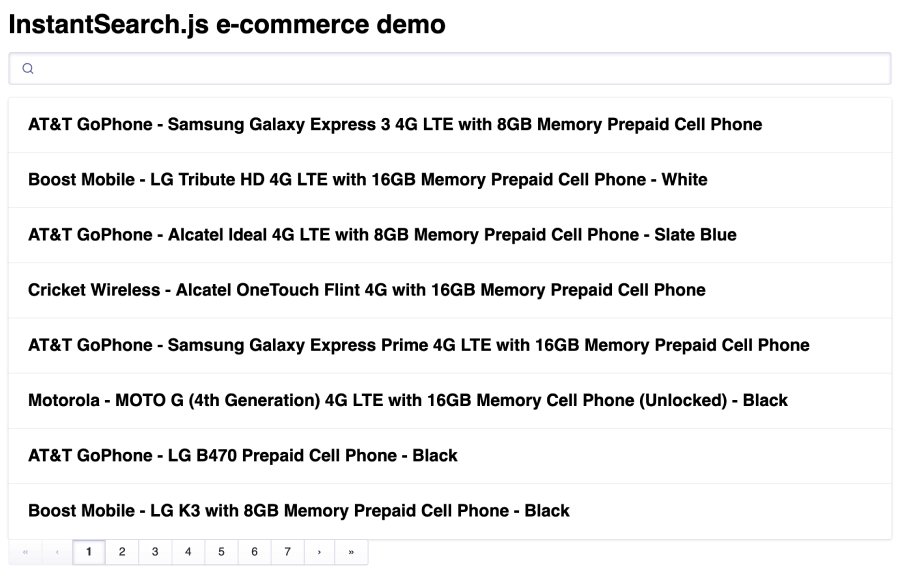
    2. Open your browser and go to [http://localhost:3000](https://localhost:3000). The app displays the search box, results, and pagination components.
           <img src="https://mintcdn.com/algolia/1WCtS02LoYjihIhK/images/instantsearch/js/getting-started-1.png?fit=max&auto=format&n=1WCtS02LoYjihIhK&q=85&s=b3a130bf601d55e69f790d152024aad8" alt="Search box with results and pagination in the quickstart app" width="900" height="570" data-path="images/instantsearch/js/getting-started-1.png" />
  </Step>

  <Step title="Add filters and settings">
    1. Open `index.html` and update it to:

       ```html HTML icon=code-xml theme={"system"}
       <div class="ais-InstantSearch">
         <h1>InstantSearch.js e-commerce demo</h1>

         <div class="left-panel">
           <div id="clear-refinements"></div>

           <h2>Brands</h2>
           <div id="brand-list"></div>
         </div>

         <div class="right-panel">
           <div id="searchbox"></div>
           <div id="hits"></div>
           <div id="pagination"></div>
         </div>
       </div>
       ```

    2. Open `src/app.js`, and add widgets to these placeholders:

       ```js JavaScript icon=code theme={"system"}
       // Before `search.start()`
       search.addWidgets([
         instantsearch.widgets.clearRefinements({
           container: "#clear-refinements",
         }),

         instantsearch.widgets.refinementList({
           container: "#brand-list",
           attribute: "brand",
         }),

         instantsearch.widgets.configure({
           hitsPerPage: 8,
         }),
       ]);
       ```
  </Step>

  <Step title="Create a two-column layout">
    The widgets come with a [predefined style](/doc/guides/building-search-ui/widgets/customize-an-existing-widget/js#style-your-widgets) but you can customize it.

    1. Open `src/app.css` and update it to the following to apply a two-column layout:

    ```css CSS icon=paintbrush theme={"system"}
              body {
                font-family: sans-serif;
                padding: 1em;
              }
              .ais-SearchBox {
                margin: 1em 0;
              }
              .ais-Pagination {
                margin-top: 1em;
              }
              .left-panel {
                float: left;
                margin-top: 1em;
                width: 250px;
              }
              .right-panel {
                margin-left: 260px;
              }
    ```

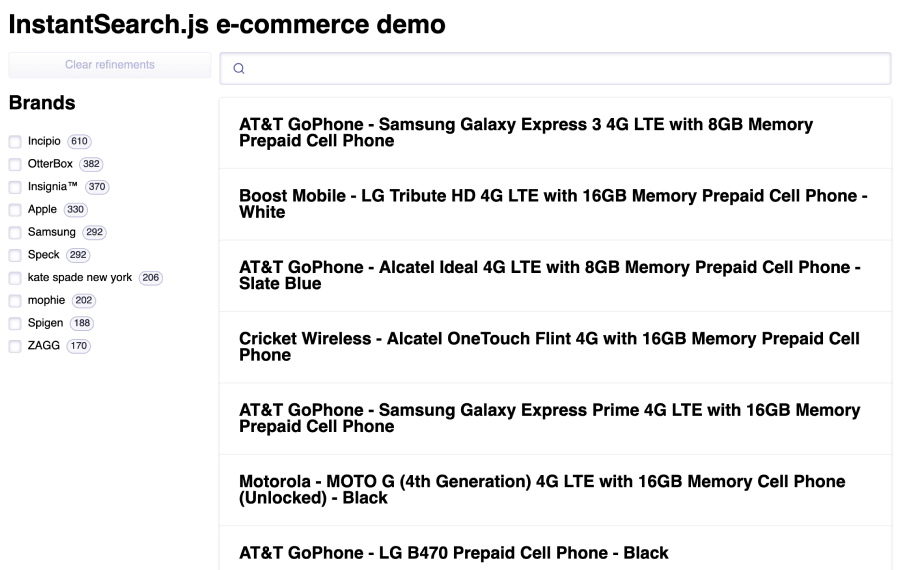
    1. In your browser, after a page refresh, the layout includes a **Brands** <Filter />.
           <img src="https://mintcdn.com/algolia/1WCtS02LoYjihIhK/images/instantsearch/js/getting-started-2.png?fit=max&auto=format&n=1WCtS02LoYjihIhK&q=85&s=a945c7305924ba7b702f2960103be127" alt="Search UI with a Brands filter in the quickstart app" width="900" height="570" data-path="images/instantsearch/js/getting-started-2.png" />
  </Step>

  <Step title="Format search results">
    Open the `src/app.js` and replace the content of the `hits` widget with:

    ```js JavaScript icon=code theme={"system"}
    search.addWidgets([
      instantsearch.widgets.hits({
        container: "#hits",
        templates: {
          item: (hit, { html, components }) => html`
            <div>
              <img src="${hit.image}" align="left" alt="${hit.name}" />
              <div class="hit-name">
                ${components.Highlight({ hit, attribute: "name" })}
              </div>
              <div class="hit-description">
                ${components.Highlight({ hit, attribute: "description" })}
              </div>
              <div class="hit-price">$${hit.price}</div>
            </div>
          `,
        },
      }),
    ]);
    ```
  </Step>

  <Step title="Refine the styling">
    1. Open `src/app.css` and replace its content with:

    ```css CSS icon=paintbrush theme={"system"}
            body {
              font-family: sans-serif;
              padding: 1em;
            }
            .ais-SearchBox {
              margin: 1em 0;
            }
            .ais-Pagination {
              margin-top: 1em;
            }
            .left-panel {
              float: left;
              margin-top: 1em;
              width: 250px;
            }
            .right-panel {
              margin-left: 260px;
            }
            .ais-InstantSearch {
              max-width: 960px;
              margin: 0 auto;
            }
            .ais-Hits-list {
              display: grid;
              grid-template-columns: repeat(2, 1fr);
              grid-gap: 1em;
            }
            .ais-Hits-item img {
              margin-right: 1em;
            }
            .hit-name {
              margin-bottom: 0.5em;
            }
            .hit-description {
              color: #888;
              font-size: 14px;
              margin-bottom: 0.5em;
            }
    ```

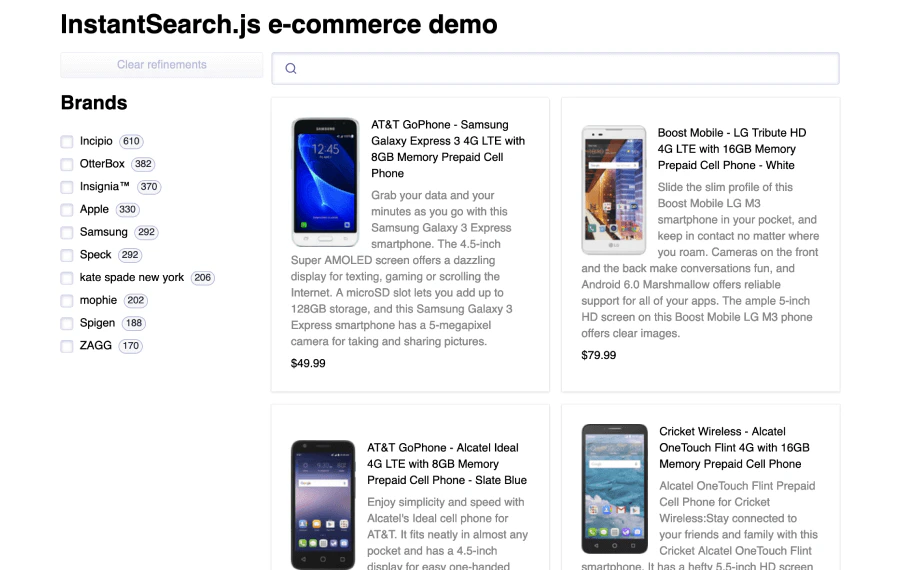
    In your browser, after a page refresh, you'll see product images.
    <img src="https://mintcdn.com/algolia/1WCtS02LoYjihIhK/images/instantsearch/js/getting-started-3.png?fit=max&auto=format&n=1WCtS02LoYjihIhK&q=85&s=47192e749d189e8989f2904caa361c04" alt="Search UI with product images in the quickstart app" width="900" height="570" data-path="images/instantsearch/js/getting-started-3.png" />
  </Step>
</Steps>

## The widgets

This quickstart uses several InstantSearch widgets:

* [`instantsearch`](/doc/api-reference/widgets/instantsearch/js) is the root InstantSearch.js component. You must wrap all other widgets inside this component.
* [`searchBox`](/doc/api-reference/widgets/search-box/js) displays a search box for users to type queries into.
* [`hits`](/doc/api-reference/widgets/hits/js) displays the results from Algolia, based on the <SearchQuery />.
* [`pagination`](/doc/api-reference/widgets/pagination/js) adds navigation controls to browse through pages of results.
* [`clearRefinements`](/doc/api-reference/widgets/clear-refinements/js) displays a button that clears the current refinements.
* [`refinementList`](/doc/api-reference/widgets/refinement-list/js) displays a list of brands that users can use to filter the search.
* [`configure`](/doc/api-reference/widgets/configure/js) passes [search parameters](/doc/api-reference/search-api-parameters). In this quickstart, it sets `hitsPerPage` to 8.

## Next steps

Instead of the credentials from `create-instantsearch-app`,
use your own Algolia [credentials](https://www.algolia.com/users/sign_up).

You can send your own data or [a sample dataset](https://github.com/algolia/datasets/blob/master/ecommerce/records.json) to Algolia using the JavaScript API client that comes preinstalled with `create-instantsearch-app`.

Then, configure the index with the JavaScript API client.
For example, to configure the sample dataset,
use the following code:

```js JavaScript icon="code" theme={"system"}
index
  .setSettings({
    searchableAttributes: [
      "brand",
      "name",
      "categories",
      "unordered(description)",
    ],
    customRanking: ["desc(popularity)"],
    attributesForFaceting: ["searchable(brand)", "type", "categories", "price"],
  })
  .then(() => {
    // done
  });
```

## See also

* [What is InstantSearch?](/doc/guides/building-search-ui/what-is-instantsearch/js)
* [Send and update your data](/doc/guides/sending-and-managing-data/send-and-update-your-data)
* [InstantSearch widgets](/doc/api-reference/widgets/js)
* [Customize an existing widget](/doc/guides/building-search-ui/widgets/customize-an-existing-widget/js)
* [Send click and conversion events](/doc/guides/building-search-ui/events/js)
