Enable events collection
To follow this guide, build search results or category pages with one of these UI libraries:- InstantSearch.js version 4.59 or later (Upgrade guide)
- React InstantSearch version 7.2.1 or later (Upgrade guide)
- Vue InstantSearch version 4.12.0 or later (Upgrade guide)
search-insights library for you from jsDelivr.
You don’t need to install or initialize it yourself.
If you’re using a Content Security Policy and
you want to let InstantSearch load search-insights,
add https://cdn.jsdelivr.net to your list of trusted JavaScript sources.
search-insights, install it
InstantSearch doesn’t load search-insights when it detects it on the page.
You can enable automatic collection in the Algolia dashboard or in your InstantSearch app.
Enabling automatic events collection does the following:
- Adds the
search-insightslibrary to your project and makes it globally available aswindow.aa - Sets an anonymous
userTokenfor events and search requests - Includes the
queryIDparameter in the search response - Sends default click and view events for your InstantSearch widgets
No code
- Go to the Algolia dashboard and select your Algolia .
- On the left sidebar, select Data sources > Events > Settings.
- Click Enable automatic events collection.
Code
Enable theinsights option:
queryID and userToken,
see Keep track of query IDs
and User token.
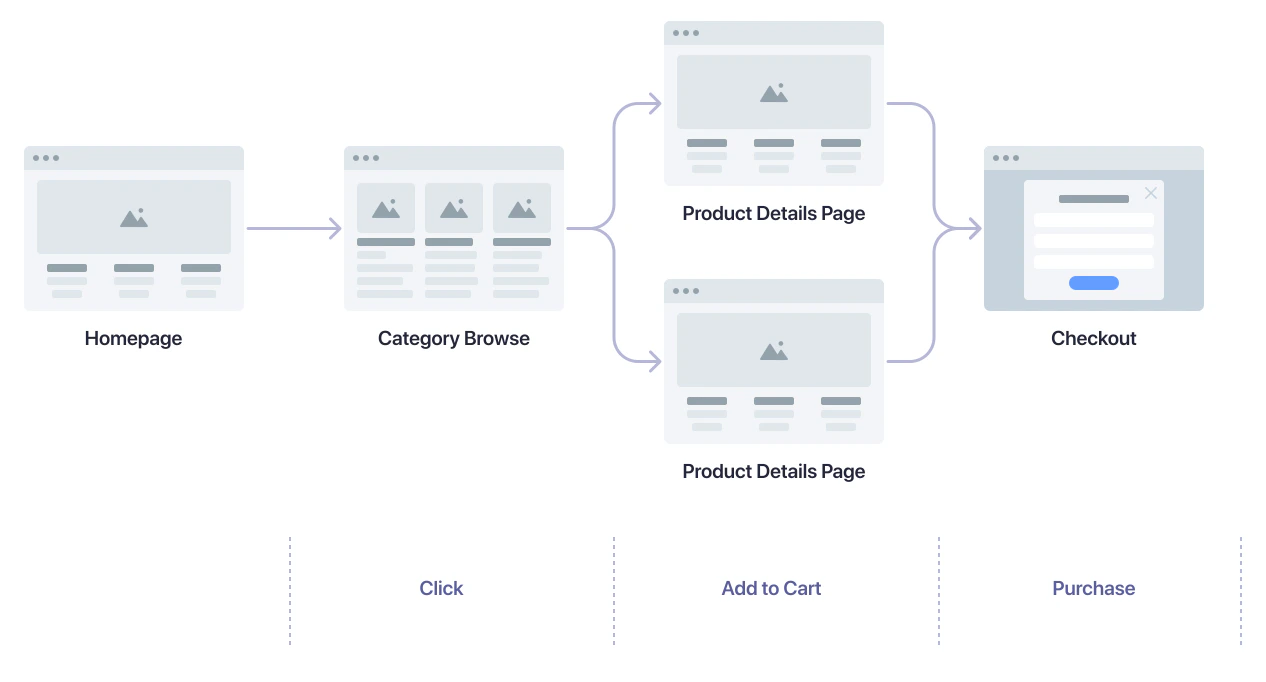
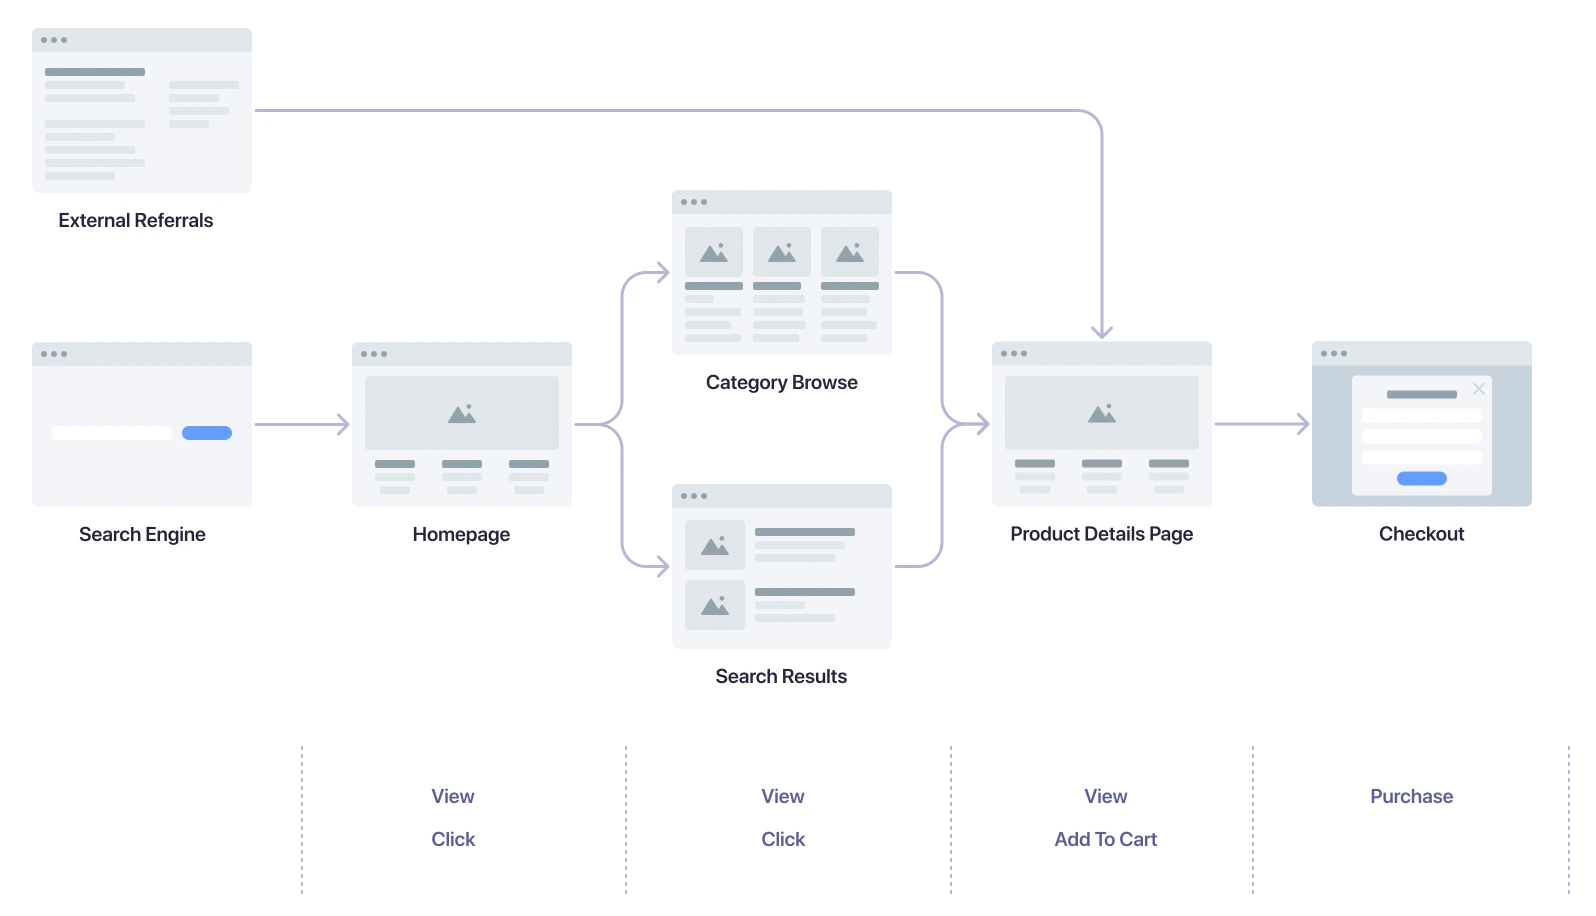
Map your ecommerce journey to events
Map the steps users take through your website and add events that aren’t automatically captured by InstantSearch widgets. Focus on the actions that lead to the final goal: the product purchase.- Search results page
- Category page
- External referrals
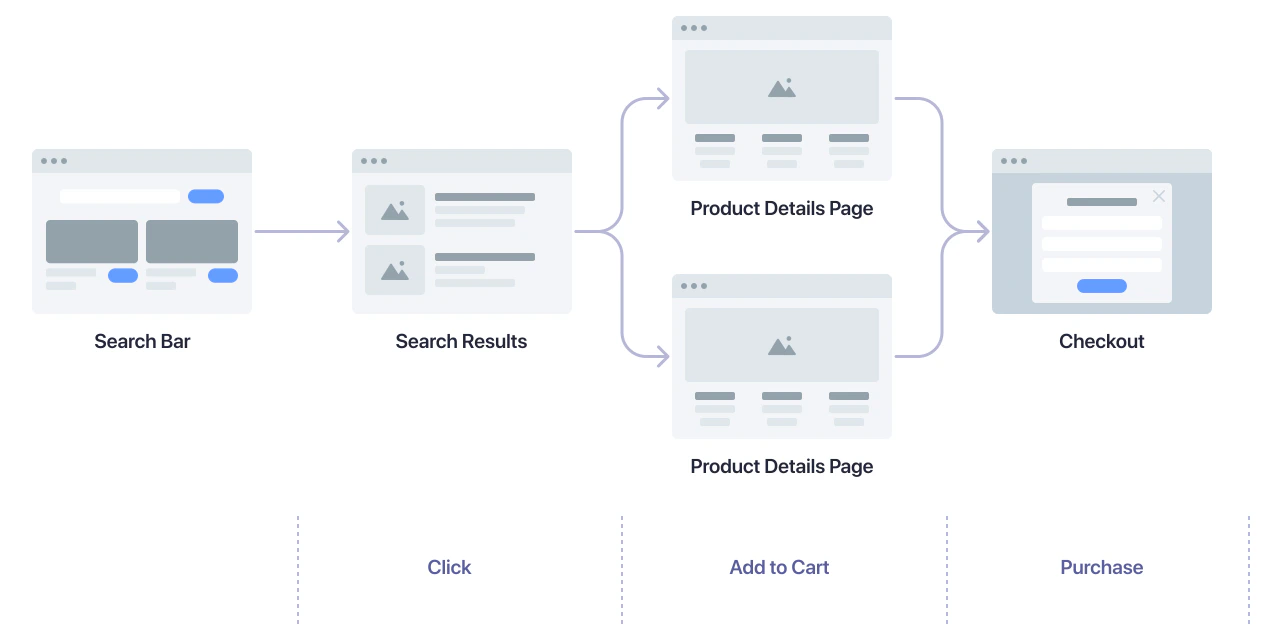
- Select a product from the search results to open the product details page.
- Add a product to the shopping cart.
- Buy the product.
Search and search results pages
Product listing and category pages
Product details page
Checkout page
Track query IDs across pages
Conversion events often happen outside the search results page.- A query ID is returned by the when a user performs a search.
- To associate a conversion with the correct , save this query ID and include it in your conversion events.
- To link conversion events back to the originating search request on your search results or category pages, track query IDs across your pages.
Track add-to-cart events
Send events from InstantSearch widgets
When your users add an item to their cart, send a specialconversion event with the addToCart subtype.
Fields representing monetary values accept both numbers and strings,
in major currency units (for example,
5.45 or '5.45').
To prevent floating-point math issues, use strings, especially if you’re performing calculations.On pages without InstantSearch widgets
Add the following code to all components and pages where users can add products to their shopping cart. For add-to-cart events associated with a search:JavaScript
window.aa object is the API client for the Insights API and is globally available
if you enabled automatic events collection.
When all objects in the event are attributed to the same query, set the queryID parameter at the root level as shown above.
However, when objects have different query IDs (for example, items added to cart from different searches), specify the queryID for each object in the objectData array:
JavaScript
queryID:
JavaScript
Track purchase events
Send events from InstantSearch widgets
When your users purchase an item, send a specialconversion event with the purchase subtype.
Fields representing monetary values accept both numbers and strings, in major
currency units (for example,
5.45 or '5.45'). To prevent floating-point
math issues, use strings, especially if you’re performing calculations.On pages without InstantSearch widgets
Add the following code to your checkout flow. When all objects in the purchase are attributed to the same query, you can set thequeryID parameter at the root level:
JavaScript
queryID for each object in the objectData array:
JavaScript
Track other conversion events
You can track other conversions in addition to add-to-cart and purchase events.Send events from InstantSearch widgets
You can use thesendEvent function to send conversion events from your InstantSearch app.
Setting custom
conversion events doesn’t prevent the custom click event from being sent.On pages without InstantSearch widgets
This is an example of a conversion that may occur on a page without InstantSearch:JavaScript
Track click events
Override default click events
Thehits and infiniteHits widgets expose a sendEvent function. Use it to send click events when users interact with your search results.
- A
clickevent with theeventName“Product Added to Favorites”. - A
clickevent with theeventName“Product Clicked” (through event propagation).
Event.stopPropagation in your event handler.
click event that you defined, it doesn’t send the default click event.
In the following example, when users click the Add to favorites button, only the “Product Added to Favorites” event is sent:
Track more click events
For Algolia Recommend and Personalization, capture additional click events when users select individual products:- On your home page
- From product recommendations
JavaScript
Optional: identify known users for Personalization
For effective personalization, identify users across sessions. It’s best to use an identifier from your authentication system after users sign in. After getting the identifier from your system, set it as theauthenticatedUserToken parameter.
JavaScript
JavaScript
Optional: send view events for Personalization
Personalization benefits from the same click and conversion events, plus it can use view events to enrich each . Use the following code snippet to track view events, such as when a user views search results.JavaScript
You don’t need to send a
queryID when tracking view events.Examples
- InstantSearch.js:
- React InstantSearch:
- Vue InstantSearch: